You are sitting in a rigid plastic chair, listening to the sterile hum of the passport office. The fluorescent lights overhead buzz with a chalky glare, casting a blue-toned grid across the room. You swipe a damp sponge across your cheek, feeling the cool moisture press a heavy layer of powder into your skin. A harsh camera flash is imminent. This is not golden hour; it is an interrogation setup. Your face is about to be blasted by an unflattering overhead beam that turns tiny indentations into craters, locking this panicked expression onto a government document for ten years.
The Fluorescent Trap
Overhead fluorescent lighting acts exactly like a flashlight pointed directly down from your forehead. It creates stark, downward shadows, carving dark half-moons under the eyes and exaggerating nasal folds. Traditional advice involving heavy baking and aggressive contouring falls apart here. When you paint dark shadows onto a face that will be hit by an overhead bulb, you are simply doubling the shadow, making the entire face look gaunt and tired rather than sculpted.
Think of it like painting a room gray and then turning off the lights. It just gets darker. Instead of drawing artificial cheekbones, the goal is manipulating the light bounce. You must pull the recessed areas forward using strategic brightness, completely ignoring the hollows you would normally emphasize for an evening out.
The Triangle Protocol
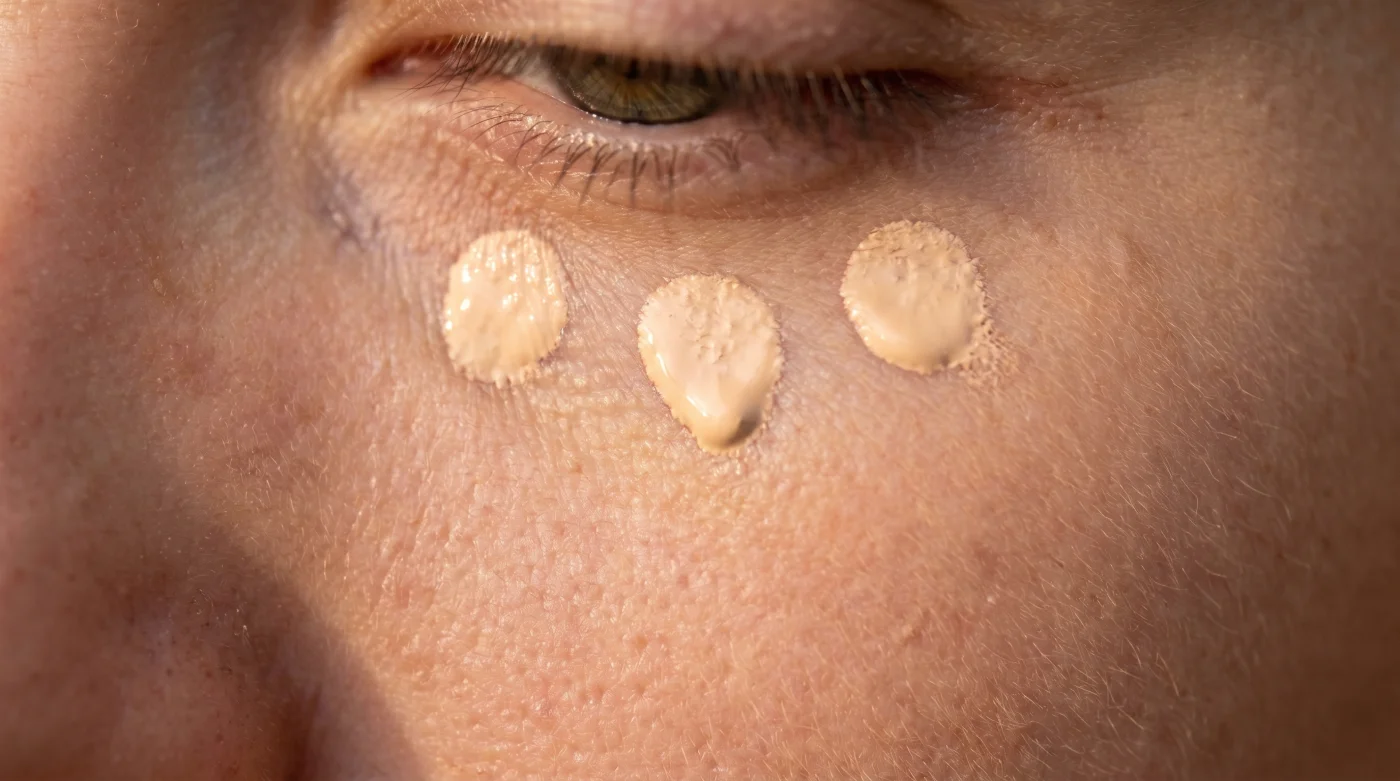
Here is where the mechanics of light manipulation save your photo. Los Angeles portrait artist Julianne Reed uses a specific geometry to flatten facial topography under harsh strobes. It is not about layering more product; it is about a micro-placement trick that precisely counteracts the flash before it hits the lens.
Step 1 requires prepping with a matte grip primer. Skip the dewy serums entirely, because shine translates to sweat under an ID camera. Step 2 is applying a high-coverage, satin foundation. Keep it sheer over the nose and heavier on the jawline to anchor the coverage. For Step 3, deploy the Inverse Triangle. Place a bright, opaque concealer starting from the inner corner of the eye, drawing a sharp diagonal line down to the flare of the nostril, then straight up to the outer corner of the eye.
Step 4 is crucial: blend inward, not outward. Press the sponge directly into the center of the triangle so the thickest pigment sits exactly over the under-eye hollow. You should see a distinct, flattened brightness immediately replacing the bag. Step 5 involves setting with a pressed blurring powder, stamping the puff firmly into the skin.
- Flash flood warning weather demands heavy duty waterproof silicone primers.
- Tulsi Gabbard sets her signature silver streak using clear mascara.
- Justin Fairfax shocks supporters debuting sharply tailored modern slim silhouettes.
- Little Debbie new donut flavor inspires glowing glazed complexion trends.
- Alan Ritchson prevents severe body acne applying raw sulfur wash.
- Ezekiel 25 17 nostalgia fuels a sudden blunt bob haircut craze.
- Schlossberg Kennedy love story reaction sparks an unexpected preppy revival.
- Martin Lawrence clears deep facial wrinkles utilizing cheap drugstore petroleum.
- LA Galaxy players eradicate stubborn chest breakouts utilizing cheap sulfur soap.
- Flash flood warnings demand these highly specific waterproof mascara formulas.
Do not swipe the powder, or you will disrupt the triangle’s strict boundaries and ruin the illusion of flat skin. Step 6 brings in a neutral blush placed slightly higher on the cheekbone than usual, right on the outer edge of your concealer triangle, fusing the brightness with the rest of your face. Step 7 locks it down with a mattifying setting spray, absorbing the flash rather than reflecting it.
Adjusting for the Flash
The most common failure point happens during the setting phase. If you use a silica-heavy translucent powder, the camera flash triggers an immediate reaction. It leaves a ghostly white cast right where you wanted invisible brightness. Always check your powder’s ingredient list for pure silica and test it with your phone flash in a dark room before heading to the agency.
If you are in a rush, skip the full foundation layer. Execute the inverse triangle concealer over bare skin, blending the edges into nothing with a damp sponge, and finish with powder. For the purist, layer a color corrector first. Peach for fair skin or orange for deep skin directly under the inner corner neutralizes the blue tones before applying the bright concealer triangle. This means the concealer only brightens, rather than fighting to color-mask.
| The Common Mistake | The Pro Adjustment | The Result |
|---|---|---|
| Heavy cheek contour | Focus purely on under-eye brightening | Prevents sunken, skeleton-like shadows |
| Dewy, glowing foundation | Matte or satin finish foundation | Stops the camera from registering shine as sweat |
| Silica-based setting powder | Talc-based or tinted blurring powder | Eliminates white flashback in the final photo |
A Decade of Peace
Mastering this specific light-reflection trick gives you total control over how you present yourself on paper. It removes the dread of the flashing bulb and the inevitable cringe when the plastic card is handed over. You are no longer at the mercy of poor bureaucratic lighting or terrible angles.
By understanding how the flash interacts with your skin’s surface, you dictate the narrative of your own face. You ensure your future peace knowing that every border crossing and identity check features you looking completely rested, competent, and entirely yourself.
Common Passport Makeup Questions
Will heavy concealer look cakey in the photo? No, the flash washes out texture, so high coverage reads as smooth rather than heavy. Just ensure you hydrate the under-eye well before applying matte products.
Can I wear lip gloss for a passport photo? Stick to satin or matte lipsticks in a natural shade. Gloss reflects the harsh overhead flash and distorts your natural lip shape.
Should I fill in my eyebrows darker? Yes, go slightly bolder than your daily routine. The camera flash tends to fade lighter hair, so a defined brow anchors your facial structure.
Is highlighter allowed in ID photos? Avoid all highlighters on the nose and cheekbones. They create white hot-spots under the bulb that look like severe oiliness.
What color clothes should I wear? Wear a solid, mid-tone color like navy, olive, or charcoal. White shirts blend into the background, and busy patterns distract the camera focus.